DuPlessis Wholesale Diamond Center is the eighth mission in SWAT 4 and the eleventh mission in SWAT: Elite Force. The SWAT team is needed for a hostage rescue mission after a group of heavily armed gunmen stormed the DuPlessis Diamond Center. The timing of the assault suggests it was not a coincidence and the suspects had inside help. None of the employees had the chance to flee due to the suddenness of the assault.
Mission Briefing[]
We have another tough one. Just before closing time, the DuPlessis Diamond Center was broken into. The suspects drove a truck through the main security doors into the lobby. The building's alarm was triggered immediately. Witnesses report multiple suspects, armed with machine guns and wearing body armor, entering the building. Witnesses also report they have not seen any of the wholesaler's employees exit the building, although it was still open and security personnel were on duty.
The DuPlessis office building is built much like a small fort. Most areas are under constant video surveillance. A separate security system and metal detector guards access to the vault. The vault door has a time lock; it locks at 1800 every night, and can't be reopened until office hours start the next day at 0900. Note that the alarm company has disabled the time lock on the door for us, in case the gunmen are hiding inside of it. The building's phone lines were disabled by the suspects.
DuPlessis is a wholesaler; they deal mainly in raw stones. This means they haven't been cleaned or cut, and they also aren't registered. However, they're harder to move; you can't take these down to the local pawnshop. This week, DuPlessis was holding a shipment of finished jewels. I don't think the timing is a coincidence. Our suspects probably have ties to black market purchasers outside of the country, since even the finished gems are a lot of gems to move.
Our suspects have automatic weapons and body armor, so they're ready for a fight. We don't know how they intended to breach the vault, which should have locked automatically when the alarm went off. One possibility is inside help, so stay on your toes. Most, if not all, of DuPlessis employees are still inside. We don't know their current condition. Study the floor plans, choose your entry and plan your assault: but don't take too long.
Timeline[]
- 16:57: Alarm triggers - Alarm triggered at DuPlessis Wholesale. Dispatch notified patrol.
- 16:59: SWAT notified - 911 Call comes in. Dispatch notified emergency services; SWAT notified.
- 17:05: SWAT Arrives - SWAT Arrives. Containment perimeter and high ground established.
- 17:11: Tactical entry begun - Decision made to go tactical.
Entries and Snipers[]
There are two possible entrances into the diamond center: through the main lobby and through the service entrance. The more suitable option is through the service entrance on the second floor as second floor is more linear and easier to navigate. The main lobby has three possible entries but you will encounter a functioning alarm system while being exposed to shots from the balcony above.
Two snipers are available in this mission. Sierra 1 and Sierra 2 are monitoring two offices on the second floor at side 1.
Map Layout[]
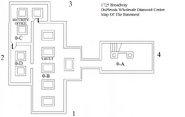
The intel provided on this mission has provided a very accurate layout given the location was secured by a professional security service. However, the placement of clutters such as large furnitures, metal detector checkpoints and security barriers are omitted from the intel.
DuPlessis Wholesale Diamond Center is a three story building and it is built like a small fort. The whole building still has fuctioning alarms and metal detectors despite the amount of damage it had suffered during the assault. Apart from the security, the building has a sophisticated interior design, such as expensive appliances, pictures or display cases with jewelry. The first floor has been designed for several workshops where raw stones are being cleaned, cut, weighed and kneaded for precious jewelry. All of those rooms contain security barriers that allow for clear visibility into the room while restricting movements. The main entrance to the DuPlessis Diamond Center located on side 1 leads to the front lobby with a metal detector and a reception desk. There is also a security office with multiple CCTV monitors and a staircase to the second floor near the front. The second floor has been designed for luxurious offices. All of these offices contains various pictures with Africa and its natural resources, along with expensive alcohols and jewelry showcases. Apart from these offices there is also a meeting room and the president's office located on side 2. At the back of the building, located on side 3 there is another staircase which connects the second floor and the first floor with the basement. There's additional service entrance on Side 3 on the second floor. In the basement of this diamond center is the large vault with multiple rows of lockers where ready jewelry are kept before it can be sold to jewelry stores. The vault door is a typical thick and round design, but it has been forced open by the time the SWAT had arrived. There is also an additional security office within the vault. Finally the building is decorated with various advertisements associated with jewelry such as necklaces, rings or earrings as well as types of precious stones such as diamonds.
Tactical Approach[]
Suspects on this map are heavily armed with shotguns, submachine guns and assault rifles. They also wear body armors while a significant number of them are equiped with gas masks. As the briefing suggests, there are also few suspects that acts as moles, and they appear the same as male civilians employees on this map while armed with machine pistols. Despite the suspect profiles, it is still advised to take several CS gas grenades into the mission, due to the amount of dividers and barriers built into the architecture as security measures.
The front foyer entrance is rigged with a metal detector that acts as an alarm while overseen by balconies from the second floor, hence it is generally a bad choice for entry. By using the second floor entrance, the player can first clear out the second floor offices , then gain control of foyer and the back stairways. Once the foyer doors on the first floor are sealed with wedges and the back stairway is occupied by the SWAT, the suspects are mostly isolated either into the vault or the first floor workshops.
It is then recommended to prioritize clearing out the vault over the first floor, due to the vault door cannot be sealed using wedges. The locker rows will divide the vault area into a maze, so expect a suspect hiding between every row of the lockers. Once the locker rows are cleared, stay away from the security office's window at side 2 since up to 3 suspects could be watching out the window and waiting to shoot. Clear the security office from the entrance closest to side 3 and funnel the barricaded suspects into an ambush once they rushed out of the office.
The biggest challenge to clear out the first floor are the three workshops which are turned into mazes with windowed security barriers that the suspects can both see through and hide. The best approch to clear them out is to double tap the room using both an AI thrown flashbang at the door way and a player thrown CS gas into the middle of the room before entering. The workshop on side 4 is is particularly troublesome since the security barrier will force player to travel to the end of the room towards side 3 before middle of the room is fully visible.
Changes in Elite Force[]
- Incapacitated civilians can bleed out and become DOA if not reported in time, which results in forfeiting the "All civilians unharmed" score bonus.
- The suspects' default loadouts have been adjusted. They now start to carry Colt M4A1 Carbines, SG552 Commando assault rifles, P226 pistols and Benelli M1 Super 90 shotguns, while G36C Assault Rifles, HK53 SMG and saw off shotguns have been removed.
- The moles' equipment have been switched from machine pistols to the Glock 17 and Glock 19 pistols.
- The max morale value for all civilians have been increased, with the male security guards having a good chance to resist shout for compliance from the officers.
- This mission unlocks the HK69 Grenade Launcher.
Trivia[]
- The briefing says that the suspects may have inside help. This is proven true as two suspects are wearing suits instead of armors and helmets.
- According to the comments in the game code, the robbers are meant to belong to a group called "Freedom Now".
Gallery[]
Soundtrack[]
| SWAT 4 Missions | ||
|---|---|---|
| SWAT 4 | Original | Riverside Training Facility - Food Wall Restaurant - Fairfax Residence - Qwik Fuel Convenience Store - A-Bomb Nightclub - Victory Imports Auto Center - Red Library Offices - Northside Vending and Amusements - DuPlessis Wholesale Diamond Center - Children of Taronne Tenement - St. Michael's Medical Center - The Wolcott Projects - Old Granite Hotel - Mt. Threshold Research Center |
| The Stetchkov Syndicate | FunTime Amusements - Sisters of Mercy Hostel - Sellers Street Auditorium - Department of Agriculture - Drug Lab - Fresnal St. Station - Stetchkov Warehouse | |
| Extra Missions (SEF) | Meat Barn Restaurant - Brewer County Courthouse | |


